
ShackLAN Control Center
Getting Started
The new ShackLAN Control Center software is designed to be used by small and
large stations. It is very configurable to meet the needs of a small
station with just a few antennas and large stations with many antennas
and stacks on multiple towers.
Although designed primarily for small 7" or 10" touchscreen displays it
will run just fine on a standard display with a mouse. Unless a small
touchscreen display is set as the primary display the touch function
will most likely not work correctly. For this reason, and several other,
a dedicated computer is recommended for touchscreen operation. The small
BeeLink computers (available on Amazon) are ideal. Control Center was actually developed on
one of these small computers.
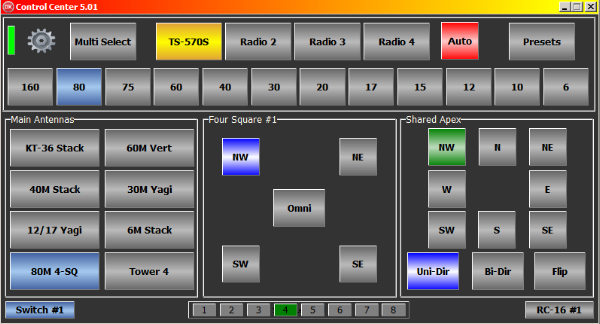
Access the Setup menu by selecting the gear icon in the upper left of the main window.
Display size and type
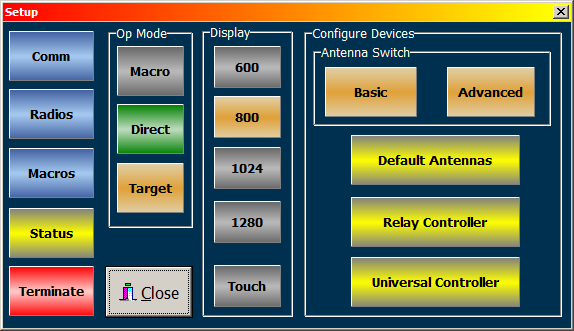
The first thing you should do is set the display parameters. There are four window sizes available. For small touchscreens, choose the one matching the native resolution of the screen. For most 7 and 10 inch screens this will be 1024. The 800 choice is good for standard displays but you may choose any size you wish. Enable the Touch function for touchscreen displays. This will turn on the virtual screen keyboard for entering text. Restart the program when finished for the new size to be applied.
Mode of operation - Macro vs Direct
The next step is to choose the mode of operation. This can be either Direct or Macro mode. They operate very differently from each other. The Direct mode is recommended for most users with a single antenna switch. The Direct mode sends antenna selections directly to the antenna switch or switch controller. Larger stations with multiple switches or using the RC-16 Relay Controller should choose the Macro mode of operation.
The ShackLAN macro system is based on "virtual antennas" per band. The antenna switches are responsible for translating the virtual antenna selections to physical antennas. The virtual antenna concept is what gives the ShackLAN system the power and flexibility to handle small stations with only a few antennas to large stations with dozens of antennas on mutilple towers. Instead of having the control software tell each switch which antenna to select and the relay controllers which relays to energize, all the configuration information is contained in each switch or relay controller. This greatly simplifies the command system and gives unparalled flexibility. When using muliple stations, each with their own computer or control point, there is no need to have each computer have its own switching configuration data.
Most users with a single antenna switch will find that the Direct mode is the best option for them. Click on the Gear icon in the upper left of the main screen to open the Setup window. There are several options in the Op Mode box. First select Direct or Macro. Choosing Direct will also enable the Target button. If you are going with the Direct mode you will need to setup the Targets which are the device, if any, you are using to control the antenna switch. Control Center can also directly control your antenna switch without any controllers present. Directly controlling the switch without any controllers is recommended fo
Dual mode
Enabling Dual Mode will display antenna control panels for both Radio 1 and Radio 2 simultaneously. This opton is available in both Direct and Macro mode. The limitation of this mode is you are only allowed a single controller panel for stack control, 4-squares, RX antennas, etc.
Set up the radios
 Click
on the Radios button in the Setup window to access the Radio Setup
window. The buttons in the Radios to Control box toggle on and off when
you click on them. Only turn on the radios you are using with Control
Center. You may give a radio a name by pressing and holding a radio
button. This recommend as the radio name appears in several places
during operation to identify the selected radio.
There are two other options in this window. They affect operation of all
radios. The first option is Auto on Band Change. If enabled, this
function will place Control Center in Auto mode for a radio when a band
change is detected. The helps prevent transmitting into a wrong antenna
after a band change as the default antenna for the new band will be
automatically selected.
The second option is Show on Band Change. This option will automatically
select a radio and make it the active radio when a band change is
detected.
Click
on the Radios button in the Setup window to access the Radio Setup
window. The buttons in the Radios to Control box toggle on and off when
you click on them. Only turn on the radios you are using with Control
Center. You may give a radio a name by pressing and holding a radio
button. This recommend as the radio name appears in several places
during operation to identify the selected radio.
There are two other options in this window. They affect operation of all
radios. The first option is Auto on Band Change. If enabled, this
function will place Control Center in Auto mode for a radio when a band
change is detected. The helps prevent transmitting into a wrong antenna
after a band change as the default antenna for the new band will be
automatically selected.
The second option is Show on Band Change. This option will automatically
select a radio and make it the active radio when a band change is
detected.
ShackLAN network connection
 Access
the Communications setup window by pressing the Comm button in the Setup
window.
Access
the Communications setup window by pressing the Comm button in the Setup
window.
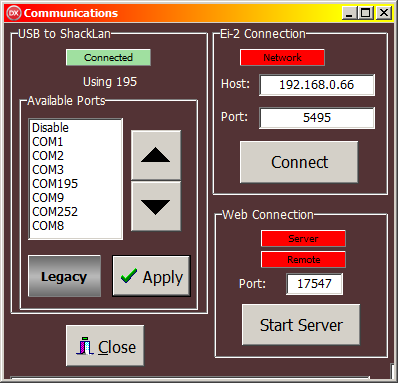
There are options for connecting to the ShackLAN network via USB or by
Ethernet to a EI-2 interface.
Most uses will connect via USB to any of the ShackLAN devices. Select
the desired USB port by clicking on it in the list or by using the
Up/Down buttons. If using the Up/Down buttons you must click the Apply
button to select the port. For a USB connection to older devices such as the Bandmaster 3 or
Bandmaster 4 you must also click on the Legacy button to interface with
these devices. You should now have a green indication showing a
successful connection
to the ShackLAN network. The Auto Connect option, when enabled, will
automatically connect to the ShackLan network when Control Center is
started. Auto Connect uses the settings that were in use the last time
Control Cenrter was in use.
Before connecting to a EI-2, enter the host name or IP
address and the port number and click the Connect button. Remember to set port forwarding on your
router for the desired port number if connecting from outside your local
network..
If you are using Direct mode proceed to
Direct Mode Configuration
Next step for Macro mode is to configure the
Macros