
Antenna Switch Configuration
Getting Started
Antenna switch configuration must be done if you are using Control Center in Macro mode. Switch configuration is done from the ShackLAN Control Center software and may be accomplished via a USB connection directly to the switch or any ShackLan unit as long as that unit is connected to the network. Open the Switch Configuration window by selecting the gear icon on the Control Center main screen and then selecting either Basic or Advanced in the Antenna Switch box. You should use the Basic option if you have only one switch with a single antenna per band or are using the Direct Mode of operation. The Advanced option is for stations using multiple daisy-chained switches or have multiple antennas on a band. Before you begin it is recommended that you have the latest firmware installed in your switch. The latest firmware is available on the Downloads page.
Establish communications
First establish a connection to the ShackLAN network. After establishing a connection to the ShackLAN network, the next step is to establish communications with the switch you wish to configure. Select the address (default is #1). The Switch indicator should turn green after a few seconds and a "configuration received" show appear in the Message box. You are now ready to start configuring the switch.
Naming the Antennas
Each antenna should be given a descriptive name. This aids in the configuration process and the assigned names will appear on the Antenna selection buttons on the main screen when Control Center is configured to operate in Direct mode. Assign a name to an antenna by selecting and holding the desired antenna button for several seconds and you will be prompted to enter a name when you release the button. If you have unused antenna ports on the switch and wish to hide them on the main screen enter a / (forward slash) as the first character in the name. The names are automatically saved as you enter them.
Basic Mode
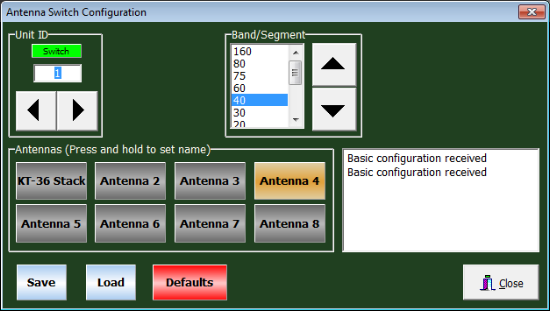
Use the Basic mode if you have only one switch and antenna selections
are the same for all radios. Once the Switch indicator turns green you are ready to begin the
configuration process. If the current antenna configuration did not
automatically download from the switch you can select the Load button to
retrieve the current configuration. First select the band and then choose
the the desired antenna port on the switch for that band. Multiple
bands may share the same antenna port. This makes it simple to setup
multi-band antennas. No diode matrix or jumper wires are required. The
antenna buttons toggle on and off to allow you to select no antennas for a
particular band.
After you have set the antennas for all bands be sure to select the
Save button to upload the new configuration to the switch. A message will
appear in the Messages window indicating the operation was successful. The
switch is now configured and you may close the window.
Advanced Mode
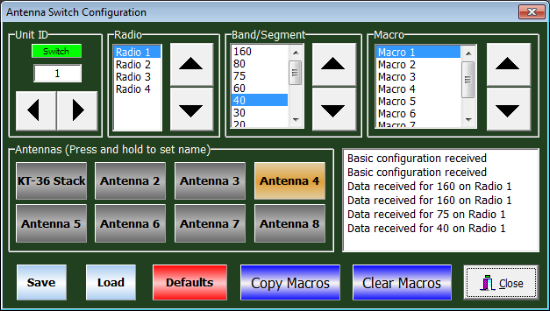
The Advanced Mode is for those using the Control Center in Macro mode with multiple antennas on a band, multiple antenna switches or the RC-16 Relay Controller and gives you flexibility not found on any other antenna switching system. It has the ability to simultaneously select multiple antennas on multiple switches with a single button click. Before you begin, it is recommended that you assign names to the Macros and make a chart of which antennas are connected to the ports (RF connectors) on each switch and which of those you want activated for each macro (antenna selection). This will make the configuration process go a lot smoother. Start the configuration by selecting the desired switch address and wait for the connection to be made. Upon a successful connection the radio list will be populated with either two or four radios automatically, depending on your switch type.
Assigning antennas to the macros
Now on to the fun part of assigning the macros to the
antenna switch ports. Here are the steps to map a macro (antenna
selection) to the switch port (physical antenna):
1 - Select the Radio and Band you wish to configure and wait for the
"Data received" message to appear. This confirms the current
configuration for this Radio and Band has been received from the switch.
Click on the Load button if the current data does not load
automatically. The macro list should also show the names you have given
each macro (selection). If these names do not appear, be sure you
entered names in the Macro Configuration
window.
2 - Select the macro in the Macro list for the macro (selection) you wish to configure.
3 - Select the antenna (physical antenna) to assign that antenna to this macro.
4 - Repeat steps 2 and 3 for each macro (selection) for this radio and band.
5 - Select the Save button when finished with each radio/band
combination to save the configuration to the switch and wait for the
message saying the update was successful.
Repeat steps 1 thru 5 for each radio/band combination.
TIP: Be sure you Save the configuration before changing bands or radios.
You may close the window when you have finished the configuration.