
BM-5 & SM-8 Config App
The new configuration app is available for Windows, Linux and
Raspberry Pi. Links are on the Downloads page. The configuration app is a
standalone application and does not require any special installation. Just
unzip into a folder of your choice. It is not recommended to place it
on the desktop.
Prerequisites:
1 - The BM-5 or SM-8 firmware must be at least version 3 or later.
2 - The Radio Number of the unit must be known as this determines the device
address on the Shacklan network. This can be set from the front panel .
New units will have the factory default setting of Radio 1.
Configuration procedure:
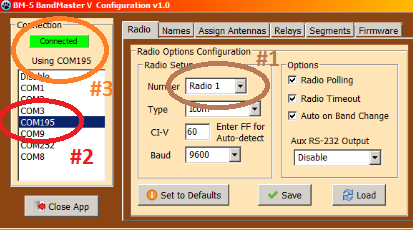 Step
1 - Click on the Radio tab and be sure the Radio Number matches
that of the unit to be configured. Step
1 - Click on the Radio tab and be sure the Radio Number matches
that of the unit to be configured.Step 2 - Click on the COM port you wish to use. This can either be a USB connection to the unit being configured or another device on the network. If choosing another device on the network configuration will take place over the ShackLAN network. Step 3 - A successful connection will be indicated by the green Connected bar. Step 4 - Set the option in the Radio Setup box to match your radio. Items in the Options box are: Radio Polling - Checking this box will enable the controller to poll the radio for frequency information. Polling is automatically halted if the controller detects another device, such as a logging program, polling the radio. Radio Timeout - This option should normally be enabled. It can be disabled for troubleshooting purposes if the controller loses frequency data from your radio periodically due to communications conflicts. Auto on Band Change - This feature will automatically place the controller in Auto mode when a band change is detected. This helps prevent transmitting in a wrong antenna accidentally. Aux RS-232 Output - The controller can send frequency data out the RS-232 port when using either Band Data or Icom radios. This is useful for sending frequency data to other devices such as an amplifier, tuner, etc. It is fixed at 9600 baud. This setting controls what format of the frequency data. Click on Save to upload your settings into the controller. |
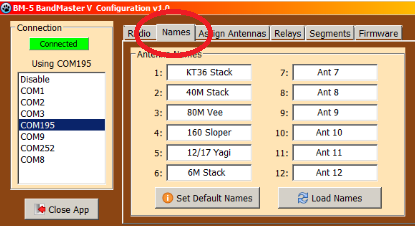 Step
5 - (Optional) The v3 and later firmware now allows you to give
descriptive names to the antennas rather than just Ant 1, Ant 2, etc. These
names will be shown on the controller LCD display when an antenna is
selected. Click on the name for an antenna and you will be prompted for the
new name. The new name is limited to 10 characters to accommodate the
controller LCD display. The new name will be save to the controller when you
click on the Ok button in the prompt window. Click on the Load Names button
to reload the names from the controller. The Set Default Names button will
set all the names to the default name of Ant 1, Ant 2, etc. Step
5 - (Optional) The v3 and later firmware now allows you to give
descriptive names to the antennas rather than just Ant 1, Ant 2, etc. These
names will be shown on the controller LCD display when an antenna is
selected. Click on the name for an antenna and you will be prompted for the
new name. The new name is limited to 10 characters to accommodate the
controller LCD display. The new name will be save to the controller when you
click on the Ok button in the prompt window. Click on the Load Names button
to reload the names from the controller. The Set Default Names button will
set all the names to the default name of Ant 1, Ant 2, etc. |
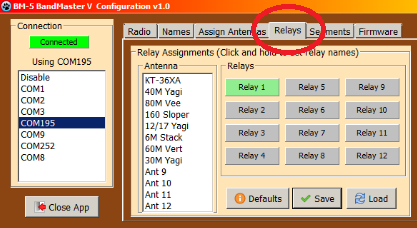 Step
6 - (Optional) This step allows you to set names for the relay
outputs on the BM-5 or a RC-16 if using the SM-8. This can make it a bit
easier when assigning relay outputs to activate for each antenna
selection. Click and hold down a Relay button for at least a second and
you will be prompted to enter a name for the relay output. These names
are saved only to your computer and not in the controller. Step
6 - (Optional) This step allows you to set names for the relay
outputs on the BM-5 or a RC-16 if using the SM-8. This can make it a bit
easier when assigning relay outputs to activate for each antenna
selection. Click and hold down a Relay button for at least a second and
you will be prompted to enter a name for the relay output. These names
are saved only to your computer and not in the controller. Step 7 - Now it is time to assign relay outputs for each of your antennas. Select the antenna from the list and click on the relay buttons to turn a relay on or off for that antenna. Click on Save for each antenna after you have made your relay selections. |
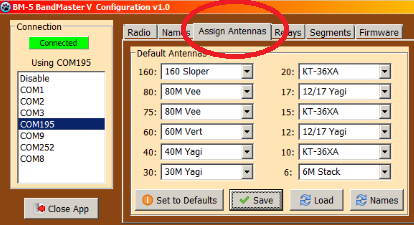 Step
8 - This is the last required step. It consists of assigning an
antenna to each band. This is where naming the antennas can really help.
For each band select the desired antenna from the drop down list. Click
on the Save button to write the configuration to the controller. This
completes the required steps to configure your controller. Step
8 - This is the last required step. It consists of assigning an
antenna to each band. This is where naming the antennas can really help.
For each band select the desired antenna from the drop down list. Click
on the Save button to write the configuration to the controller. This
completes the required steps to configure your controller. |
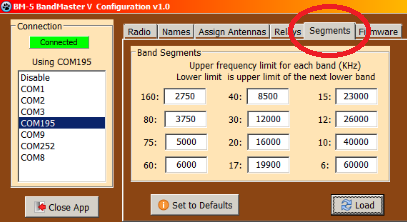 The
v3 and later firmware also provides the ability to define your
own band segments. The only one you may wish to change is the
80M one to move the divide between 80M and 75M. Changing a
segment limit is as simple as clicking on the one to change and
entering the new value. Remember that all frequencies are in
KHz. No decimal points. The
v3 and later firmware also provides the ability to define your
own band segments. The only one you may wish to change is the
80M one to move the divide between 80M and 75M. Changing a
segment limit is as simple as clicking on the one to change and
entering the new value. Remember that all frequencies are in
KHz. No decimal points. |